When building modern applications, configuration flexibility is essential. Hardcoding sensitive data such as API keys, database URLs, or secrets directly into your codebase is a recipe for trouble. That’s where environment variables in NestJS shine.NestJS supports environment variables out of the box via its built-in @nestjs/config package, helping developers write clean, secure, and easily configurable applications.In this article, you’ll […]
When building modern applications, configuration flexibility is essential. Hardcoding sensitive data such as API keys, database URLs, or secrets directly into your codebase is a recipe for trouble. That’s where environment variables in NestJS shine.
NestJS supports environment variables out of the box via its built-in @nestjs/config package, helping developers write clean, secure, and easily configurable applications.
In this article, you’ll learn how to set up, use, and manage environment variables in your NestJS project the right way.
Why Use Environment Variables?
Environment variables offer a secure and flexible way to manage configuration values. By storing credentials, tokens, and configuration settings outside your source code, you can:
- Keep secrets out of version control
- Easily switch configurations between development, staging, and production
- Avoid code repetition and simplify deployments
Setting Up Environment Variables in NestJS
To begin using environment variables in your NestJS app, install the official @nestjs/config package:
npm install @nestjs/config
Then import ConfigModule into your AppModule:
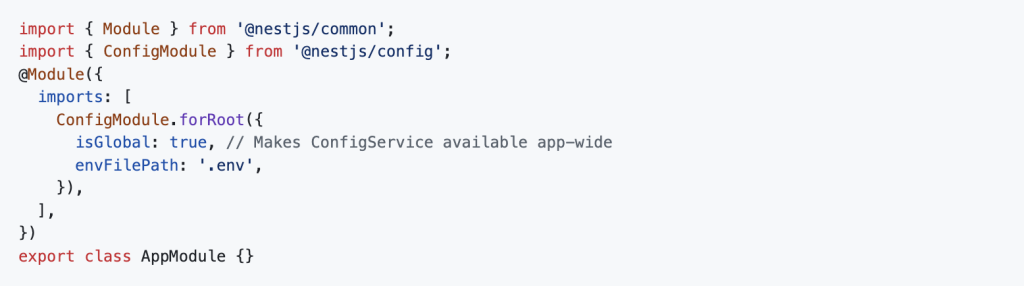
Create a .env file in your root directory:

Now these variables are accessible throughout your app using ConfigService.
Accessing Environment Variables
To access environment variables inside services, controllers, or providers, inject ConfigService:
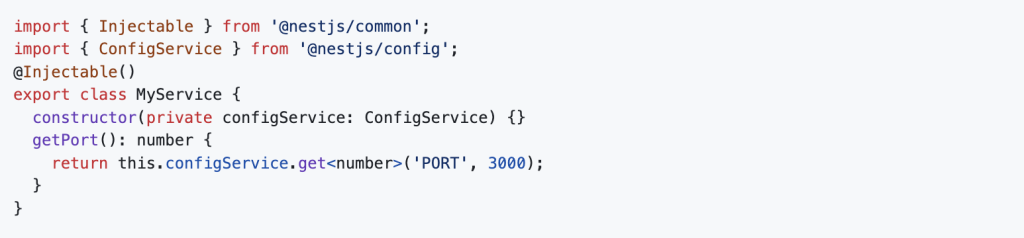
The second argument to .get() is a default value in case the environment variable isn’t set.
Validating Environment Variables
A best practice is to validate your .env variables to avoid runtime errors. Use the Joi library for schema validation:
npm install joi
Update ConfigModule setup:
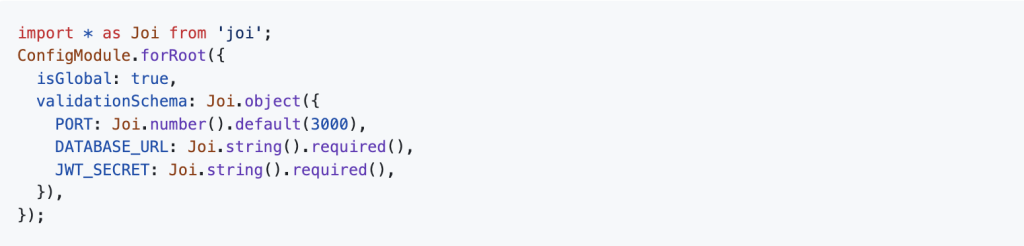
This ensures that your app won’t start if essential environment variables are missing or incorrectly typed.
Using Multiple .env Files
For better organisation across environments, you can specify different .env files like:
.envfor default values.env.development.env.production
SetenvFilePathdynamically based on theNODE_ENV:

Set the NODE_ENV in your scripts:

Security Considerations
- Never commit your
.envfiles to version control — use.gitignore - Store production secrets securely using CI/CD secrets or managed services (e.g., AWS Secrets Manager)
- Always validate and sanitize values coming from the environment
Real-World Use Cases
You can use environment variables to configure:
- Database connection strings
- API base URLs
- 3rd-party keys (Stripe, Twilio, Firebase)
- Feature flags
- Logging levels
- Environment-specific configurations
Final Thoughts
Using environment variables in NestJS projects ensures that your app remains secure, flexible, and easy to manage across different environments. By leveraging the power of @nestjs/config, you get seamless integration with validation and support for multiple configurations out of the box.
Ready to take your Node.js backend to the next level? Discover how professional teams manage configurations and build scalable architectures with NestJS and Node.js at Dev Centre House Ireland.