
Automating routine tasks is crucial for maintaining efficient backend systems. Whether it’s sending out reports, clearing caches, or running database backups, scheduled tasks help streamline backend operations. In this article, we’ll explore how to implement Cron Jobs in NestJS, a powerful Node.js framework known for its modular architecture and scalability.
Why Schedule Tasks in NestJS?
Manual processes are prone to errors and time-consuming. That’s where automation steps in. NestJS offers built-in support for scheduling tasks using cron expressions through the @nestjs/schedule package.
Some common use cases include:
- Periodic database cleanups
- Email reminders or newsletter scheduling
- Automated data syncing between services
- Monitoring tasks like CPU/memory logs
Setting Up Cron Jobs in NestJS
To get started with task scheduling in NestJS, we need to install the scheduling module provided by NestJS.
Step 1: Install Required Package
Run the following command:
npm install @nestjs/schedule
Also, install @nestjs/common and rxjs if not already present.
Step 2: Import the ScheduleModule
Inside your app module (app.module.ts), import ScheduleModule:
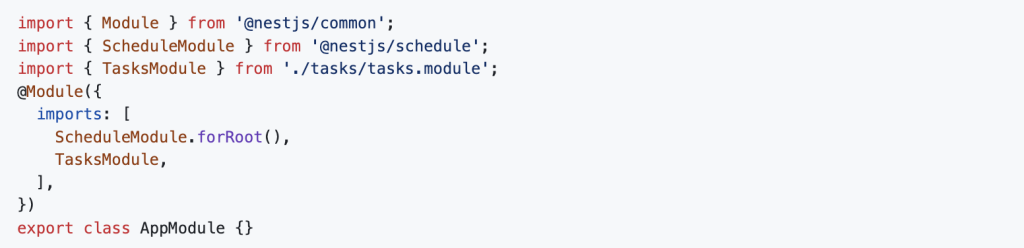
This enables the scheduling service globally.
Step 3: Create a Tasks Service
Now, let’s create a service where our cron jobs will be defined:
nest generate service tasks
Step 4: Add a Cron Job
In tasks.service.ts, use the @Cron() decorator to define your cron jobs.
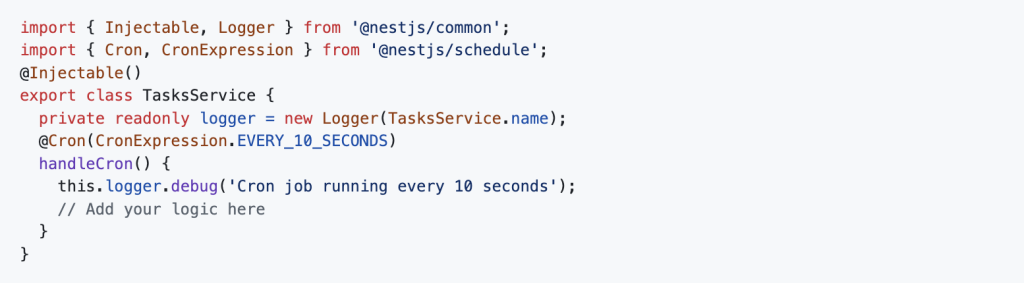
You can also use custom cron expressions, for example:
@Cron('45 * * * * *') // every minute at 45 seconds
Using Interval and Timeout
Besides @Cron, NestJS also provides @Interval() and @Timeout() decorators:
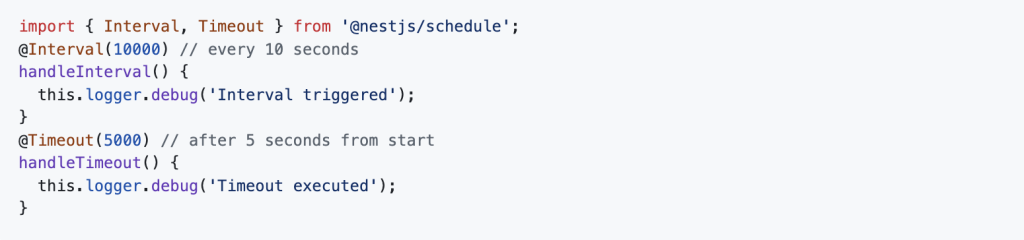
These are useful for shorter tasks that don’t need precise timing like cron jobs.
Managing Multiple Cron Jobs
You can create multiple methods with different cron expressions within a single service or split them across multiple services depending on how modular you want the structure to be.
It’s good practice to give each method a clear name and keep the logic concise or delegate it to helper services.
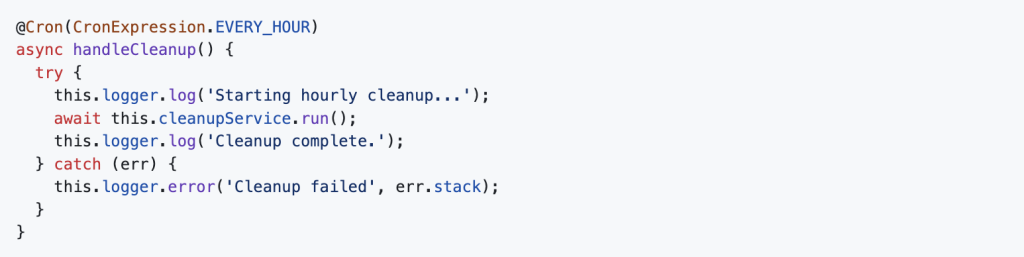
Error Handling and Logging
To make your scheduled tasks production-ready:
- Use try-catch blocks to handle potential errors
- Add logging to track when jobs run and whether they succeed or fail
- Integrate monitoring tools like Sentry for advanced observability
Testing Cron Jobs
Since cron jobs are time-based, testing them can be tricky. Consider:
- Using shorter cron intervals in test environments
- Mocking the service logic being called by the cron method
- Using unit tests to validate the logic independently of the schedule
Final Thoughts
Scheduling background tasks in NestJS is simple yet powerful, thanks to the robust @nestjs/schedule package. Whether you need to run something every few seconds or once a month, NestJS gives you the tools to do it cleanly and efficiently.
For production applications, combine scheduled jobs with proper logging, error handling, and monitoring to ensure reliability and visibility.
Want to explore how companies implement scalable Node.js backends in production? Check out Dev Centre House Ireland’s backend tech stack to learn more.
FAQ
Question: What is the purpose of scheduling tasks in a NestJS application?
Answer: Scheduling tasks allows you to automate repetitive jobs such as sending notifications, cleaning up databases, or syncing external data. At Dev Centre House Ireland, scheduled tasks are used to keep enterprise apps running efficiently.
Question: How are Cron Jobs implemented in NestJS?
Answer: NestJS uses the @nestjs/schedule package to implement Cron Jobs. Developers can define tasks using decorators like @Cron() to schedule execution at specific intervals.
Question: What are the types of Cron-based decorators available in NestJS?
Answer: NestJS supports several decorators, such as @Cron(), @Interval(), and @Timeout() for various scheduling needs. Dev Centre House Ireland uses all three to create flexible and powerful automation flows.
Question: How does the @Cron() decorator work in NestJS?
Answer: The @Cron() decorator accepts a cron expression and runs the associated method based on the defined schedule. For example, it can run a task every hour, day, or week, depending on the configuration.
Question: What is the benefit of using Cron expressions in NestJS?
Answer: Cron expressions provide precise control over task scheduling. They are concise and widely used, making it easy to configure complex schedules in backend applications.
Question: Can tasks be dynamically scheduled at runtime?
Answer: Yes, NestJS allows dynamic task scheduling using the SchedulerRegistry service, letting developers add or remove scheduled jobs during runtime. This is useful for building adaptive systems.
Question: How does Dev Centre House Ireland use Cron Jobs in real-world projects?
Answer: Dev Centre House Ireland uses Cron Jobs to manage tasks like daily report generation, user reminders, data syncing, and system health monitoring, ensuring backend processes stay on track without manual intervention.