In modern web development, ensuring your APIs are well-documented is just as important as creating them. API documentation makes it easier for developers to understand how to interact with your service, and having up-to-date docs can save time during development and troubleshooting. Fortunately, with NestJS and Swagger, you can automate this process to ensure that your API documentation […]
In modern web development, ensuring your APIs are well-documented is just as important as creating them. API documentation makes it easier for developers to understand how to interact with your service, and having up-to-date docs can save time during development and troubleshooting.
Fortunately, with NestJS and Swagger, you can automate this process to ensure that your API documentation is always in sync with your codebase.
In this post, we’ll walk through how to auto-generate API documentation using NestJS and Swagger. By the end, you’ll be able to create clean, interactive API documentation that’s automatically updated as your code evolves.
What is Swagger?
Swagger is a framework for API documentation that provides a powerful set of tools to describe, consume, and visualize RESTful APIs. It is widely adopted in the industry due to its ability to automatically generate API docs, create interactive user interfaces, and help with API testing. Swagger’s user-friendly UI allows developers to easily interact with an API and see the request/response structure without needing to inspect the backend code directly.
Benefits of Using Swagger with NestJS
Integrating Swagger with NestJS brings a range of benefits to developers and teams, including:
- Auto-Generated Docs: Swagger auto-generates API documentation from your NestJS controllers and DTOs (Data Transfer Objects), keeping it up to date as you modify your code.
- Interactive UI: Swagger provides an interactive interface where developers can make real API requests directly from the docs.
- Validation: It helps with request validation, so you can ensure that the requests being made to your API are correctly formatted.
- Easy Collaboration: Teams can collaboratively work on an API, thanks to the auto-generated and easily understandable documentation.
Setting Up Swagger in a NestJS Project
Integrating Swagger into your NestJS application is simple. You’ll need to install the necessary dependencies and set up the configuration.
Step 1: Install Dependencies
Start by installing the @nestjs/swagger package and swagger-ui-express for the Swagger UI.

Step 2: Configure Swagger
Next, configure Swagger in the main.ts file of your NestJS application. Add the following code after initializing the NestJS app:
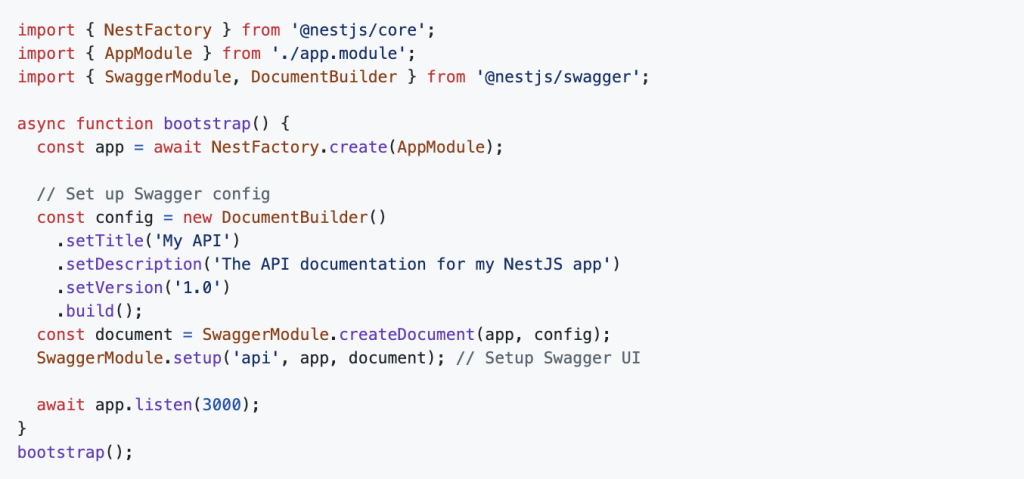
This will configure Swagger and make the documentation available at the /api endpoint of your application.
Step 3: Add Swagger Annotations to Your Controllers and DTOs
To make your API documentation more informative, you can use Swagger decorators to describe the endpoints, parameters, request bodies, and responses.
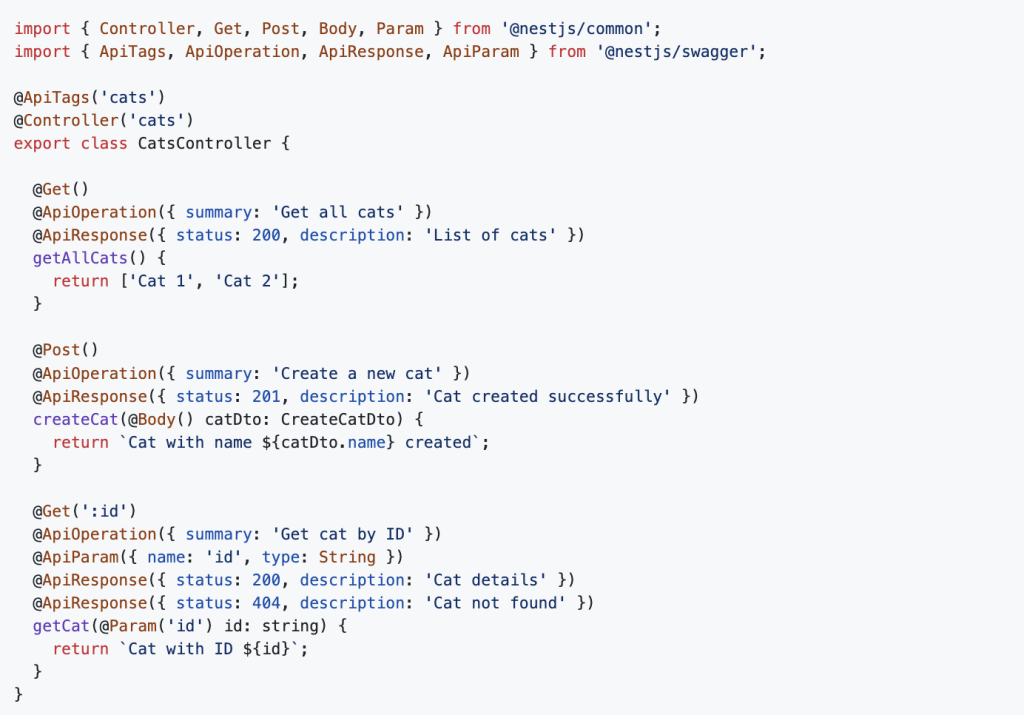
Example: A Simple Controller
Let’s say we have a simple CatsController that handles CRUD operations for “cats”:
Example: DTO (Data Transfer Object)
For request bodies, you can use DTOs to define the structure of your input data. In this case, we’re creating a CreateCatDto class to define the data structure for creating a new cat:
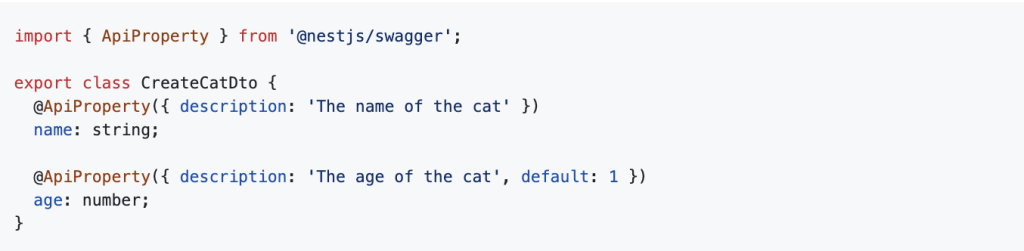
Here, the @ApiProperty() decorator is used to describe the properties of the CreateCatDto. These annotations will be reflected in the auto-generated Swagger docs.
Step 4: Running the Application
Now, when you run your NestJS app using:
npm run start
You can navigate to http://localhost:3000/api to see the interactive Swagger documentation for your API. You’ll be able to view all your routes, parameters, and response models in a neatly organised, easy-to-navigate UI.
Customizing Your Swagger Documentation
You can further customise the appearance and behaviour of your Swagger documentation. For example:
- Customizing Models: Use the
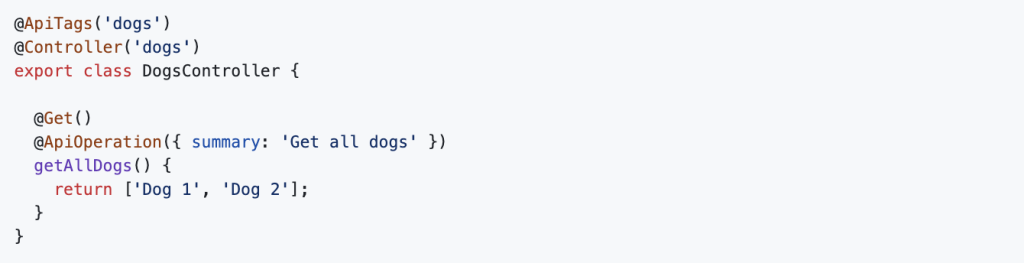
@ApiResponse()decorator to describe the structure of the responses. - Grouping Endpoints: You can group endpoints by tags using
@ApiTags(), which is particularly useful for large APIs. - Authentication: Swagger can also be configured to document API authentication methods like OAuth2 or JWT tokens.
Example of Grouping Endpoints with Tags
Conclusion
Integrating Swagger with NestJS is a straightforward process that provides significant benefits to any API project. With auto-generated, interactive API documentation, your team can be more productive and confident about how to use the API.
Swagger doesn’t just improve documentation; it enhances testing, validation, and collaboration. And by leveraging NestJS’s powerful decorators and Swagger integration, you can automate the documentation process and ensure it stays up to date with minimal effort.
Start adding Swagger to your NestJS projects today to improve your API development workflow and enhance collaboration with your team.
For more insights into powerful backend technologies like NestJS, visit Dev Centre HouseI reland’s Node.js expertise page.
FAQ
Question: What is Swagger and how does it help in NestJS development?
Answer: Swagger is a powerful open-source tool that generates interactive API documentation. In NestJS, it simplifies the process of documenting REST APIs by auto-generating docs from code annotations.
Question: Why should I integrate Swagger with my NestJS project?
Answer: Swagger improves developer experience, helps front-end teams understand endpoints, speeds up testing, and ensures consistent API usage—key benefits embraced by Dev Centre House Ireland when delivering scalable APIs.
Question: How do I install Swagger in a NestJS project?
Answer: You can install Swagger using @nestjs/swagger and swagger-ui-express via npm. Once installed, you can integrate it into your main file with minimal setup.
Question: What decorators are used to generate Swagger docs in NestJS?
Answer: Common decorators include @ApiTags, @ApiOperation, @ApiResponse, @ApiProperty, and @ApiBearerAuth. These help define the structure and behavior of your API endpoints.
Question: Can Swagger generate models from DTOs automatically in NestJS?
Answer: Yes, Swagger can use class-based DTOs with @ApiProperty annotations to automatically generate detailed models in the documentation.
Question: Is it possible to customize the Swagger UI in NestJS?
Answer: Absolutely. You can customize the title, description, version, and other settings using SwaggerModule.createDocument() and setup() options.
Question: How can I document route authentication in Swagger?
Answer: Use @ApiBearerAuth() along with NestJS guards to indicate that an endpoint requires authentication. This appears clearly in the Swagger UI.
Question: What are the best practices for using Swagger with NestJS?
Answer: Best practices include consistent use of decorators, organizing endpoints with @ApiTags, documenting all request and response types, and separating public/private routes in Swagger setup.
Question: Can I generate OpenAPI-compliant docs using Swagger in NestJS?
Answer: Yes, @nestjs/swagger is OpenAPI-compliant, meaning the generated docs can be used with any tools that follow the OpenAPI standard.
Question: How does Dev Centre House Ireland use Swagger in client projects?
Answer: Dev Centre House Ireland leverages Swagger to ensure transparency and efficiency between back-end and front-end teams by providing auto-generated, always-up-to-date documentation.
Question: Can Swagger handle nested objects and arrays in DTOs?
Answer: Yes, Swagger supports complex types, including nested objects and arrays, as long as they are properly annotated with @ApiProperty.
Question: Is it possible to generate Swagger documentation only for selected modules?
Answer: Yes, you can use the include option in SwaggerModule.createDocument() to include only specific modules, making the docs more focused.
Question: How do I hide routes from Swagger documentation in NestJS?
Answer: Use the @ApiHideProperty() decorator on specific properties or avoid using Swagger decorators entirely on the route to exclude it from the docs.
Question: What version of NestJS and Swagger should I use for best compatibility?
Answer: It’s recommended to use compatible versions of @nestjs/swagger and NestJS core. Dev Centre House Ireland stays up-to-date with the latest stable versions to ensure smooth integration.
Question: Can I export or download the Swagger API schema from NestJS?
Answer: Yes, you can export the OpenAPI JSON schema using SwaggerModule.createDocument() and save it for external use or integrations.