When building scalable and maintainable backend applications, data validation and type safety are essential. NestJS promotes these best practices through DTOs (Data Transfer Objects) and Validation Pipes, enabling developers to enforce consistent data structures and validate user input effortlessly. In this article, we’ll explore how to use DTOs and Validation Pipes in NestJS, why they matter, and how they can […]
When building scalable and maintainable backend applications, data validation and type safety are essential. NestJS promotes these best practices through DTOs (Data Transfer Objects) and Validation Pipes, enabling developers to enforce consistent data structures and validate user input effortlessly.
In this article, we’ll explore how to use DTOs and Validation Pipes in NestJS, why they matter, and how they can dramatically improve your development workflow.
What Are DTOs in NestJS?
DTOs, or Data Transfer Objects, are TypeScript classes that define the shape of data being sent over the network. In NestJS, DTOs are used to describe the expected structure of request bodies, query parameters, or route parameters.
They are especially useful when working with TypeScript because they provide static typing, autocomplete, and error detection at compile time.
Example: Creating a DTO
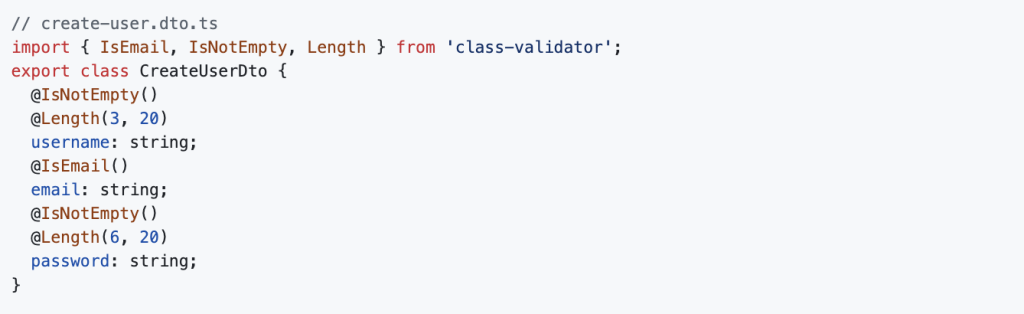
This DTO defines validation rules for creating a user. You’ll notice decorators from the class-validator package. These rules ensure that user input matches the desired format.
Introducing Validation Pipes
Validation Pipes are a powerful feature in NestJS that enable you to apply transformation and validation logic to incoming requests. By combining Validation Pipes with DTOs, you can automatically check and transform data before it reaches your controller methods.
Setting Up ValidationPipe Globally
To activate validation across your application, use the ValidationPipe globally in the main bootstrap file:
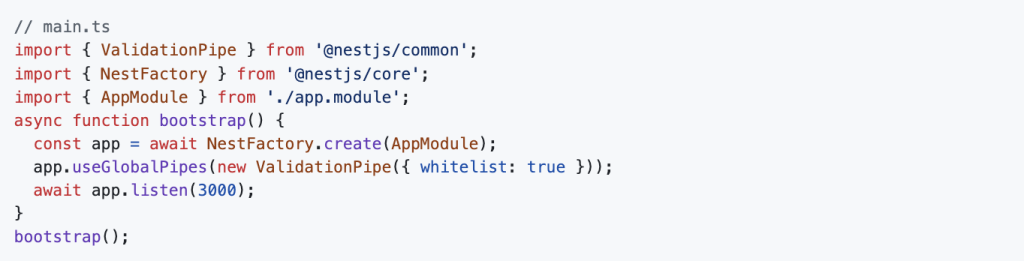
The { whitelist: true } option strips out any properties that are not in your DTO, which is a good practice for security and cleanliness.
Using DTOs and Pipes in Controllers
With DTOs and ValidationPipe in place, you can apply them in your route handlers:
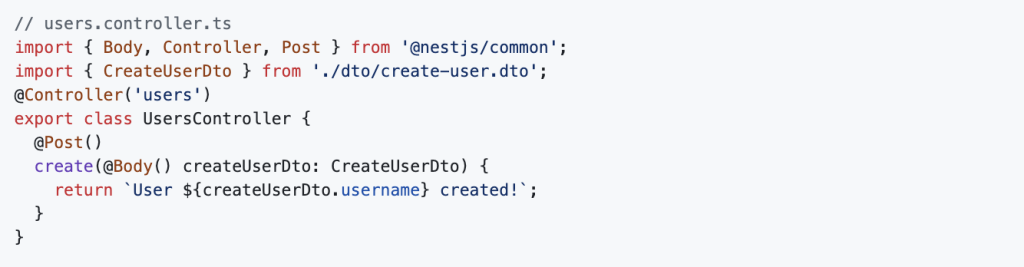
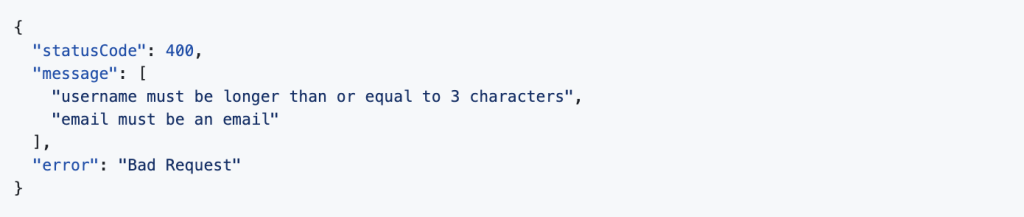
Here, NestJS automatically validates the incoming request body against the rules defined in CreateUserDto. If the validation fails, a 400 error is returned with helpful error messages.
Transformation with ValidationPipe
ValidationPipe also allows you to transform incoming data types. For example, converting strings to numbers:

And then use @Type() from class-transformer in your DTO:

This ensures the limit query parameter is treated as a number instead of a string.
Best Practices with DTOs and Validation
- Keep DTOs simple and focused on one purpose.
- Use whitelisting to strip unwanted data.
- Always return clear error messages for validation failures.
- Reuse DTOs where applicable to maintain consistency.
- Use
PartialType()from@nestjs/mapped-typesfor update DTOs:

This automatically makes all fields optional for update operations.
Error Handling with ValidationPipe
When validation fails, NestJS throws a BadRequestException with a standard structure:
You can customise the error format globally by passing an exceptionFactory to the pipe.
Final Thoughts
Using DTOs and Validation Pipes in NestJS is one of the cleanest ways to manage data validation in modern APIs. With a few lines of code, you ensure that your application accepts only valid, expected data, reducing bugs and enhancing security.
If you’re building production-grade backends with NestJS, mastering DTOs and validation is essential.
Looking to explore more backend patterns with Node.js and NestJS? Visit DevCentreHouse – Node.js Development for insights and solutions tailored for enterprise-grade applications.
FAQ
Question: Why should developers use DTOs in NestJS backend applications?
Answer: DTOs (Data Transfer Objects) help define clear data contracts, enforce validation, and decouple layers, making NestJS apps more maintainable and consistent. Dev Centre House Ireland implements DTO-driven architecture to ensure clean, scalable APIs.
Question: What are pipes in NestJS, and how do they work?
Answer: Pipes transform and validate incoming data in NestJS controllers before it reaches business logic. Dev Centre House Ireland uses pipes for input sanitation and type enforcement, ensuring robustness in backend services.
Question: How do DTOs and pipes together improve backend scalability?
Answer: Combined, DTOs define expected input and pipes verify or transform it, reducing runtime errors and improving data consistency. Dev Centre House Ireland leverages this pairing to build reliable and scalable backend infrastructure.
Question: What are common validation decorators used in NestJS DTOs?
Answer: Decorators like @IsString, @IsNumber, @IsBoolean and @IsNotEmpty from class-validator ensure the data entering controllers meets schema requirements. Dev Centre House Ireland enforces these standards for clean, predictable APIs.
Question: How do DTOs enhance code readability in large codebases?
Answer: They provide structured input models that clearly represent required fields and types, making controller logic cleaner and easier to maintain. Dev Centre House Ireland values this separation for long-term backend clarity.
Question: Can pipes handle custom logic beyond validation?
Answer: Yes. Custom pipes can transform data (e.g. parsing dates or sanitising strings) before passing it along. Dev Centre House Ireland often implements tailored pipes that support domain-specific rules and integrations.
Question: Is NestJS suitable for enterprise-grade backend systems?
Answer: Absolutely. With its modular architecture, decorators, DTOs, and pipes, NestJS supports complex, scalable backend systems. Dev Centre House Ireland uses NestJS to power high-performance enterprise backends.
Question: How does NestJS support type safety in API communication?
Answer: By leveraging TypeScript along with DTO definitions, NestJS ensures compile-time type checks. Dev Centre House Ireland uses this typing to minimise runtime errors and enforce contractual clarity.
Question: Can NestJS pipes help prevent security risks?
Answer: Yes, by validating and sanitising inputs, DTOs and pipes help prevent injection attacks and malformed data. Dev Centre House Ireland integrates validation polymers to add robust security layers to backend endpoints.
Question: How can I get started using DTOs and pipes in a NestJS project?
Answer: Begin by defining DTO classes for each route and apply pipes like ValidationPipe in controllers or globally. Dev Centre House Ireland provides hands-on consulting and implementation of scalable backend architecture. Learn more at https://www.devcentrehouse.eu/en