Creating a blog application from scratch can seem overwhelming, but with the right technology stack, it becomes an exciting and rewarding experience. In this guide, we will walk you through setting up a blog application using XAMPP, MySQL, phpMyAdmin, and NestJS. This tutorial will help you understand how to structure your database, connect it to a backend, and create a fully functional blog system.
Why Choose XAMPP, MySQL, phpMyAdmin, and NestJS?
XAMPP
XAMPP is an easy-to-use, lightweight Apache distribution that simplifies the setup of a local web server. It includes Apache, MySQL, PHP, and Perl, making it an excellent choice for web development.
MySQL
MySQL is a widely used relational database management system that ensures structured data storage and retrieval. It is robust, secure, and seamlessly integrates with multiple backend frameworks, including NestJS.
phpMyAdmin
phpMyAdmin provides a user-friendly interface for managing MySQL databases, making database operations simpler and more accessible.
NestJS
NestJS is a progressive Node.js framework for building efficient, reliable, and scalable applications. It supports TypeScript, modular architecture, and dependency injection, making it an excellent choice for backend development.
Setting Up the Development Environment
Installing XAMPP
- Download and install XAMPP from the official Apache Friends website.
- Open the XAMPP Control Panel and start Apache and MySQL.
Setting Up MySQL Database
- Open phpMyAdmin by visiting
http://localhost/phpmyadmin/in your browser. - Create a new database named
blog_app. - Within the
blog_appdatabase, create a table calledpostswith the following structure:

Creating the Backend with NestJS
Installing NestJS
Ensure you have Node.js installed, then install the NestJS CLI:

Create a new NestJS project:

Setting Up TypeORM with MySQL
NestJS supports TypeORM, which simplifies working with MySQL databases. Install the required dependencies:

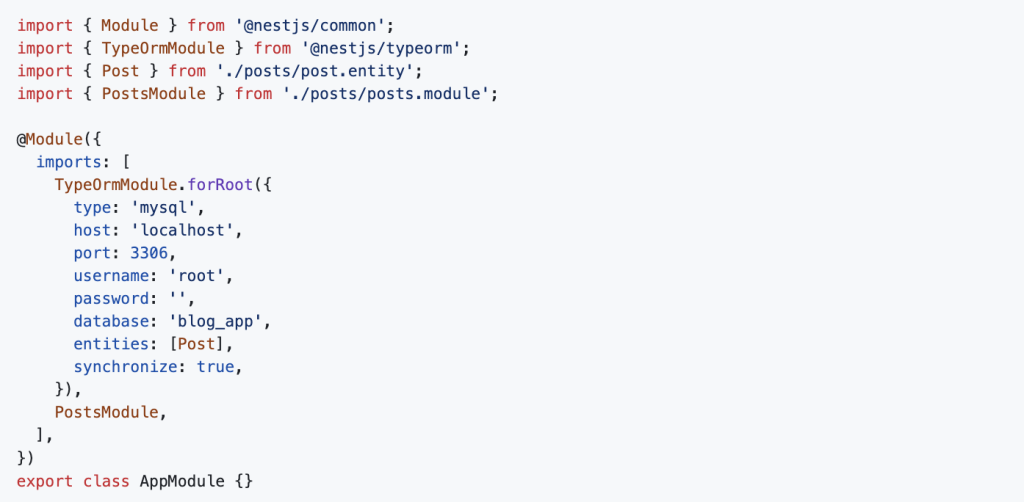
Update app.module.ts to configure TypeORM:
Creating the Blog Post Entity
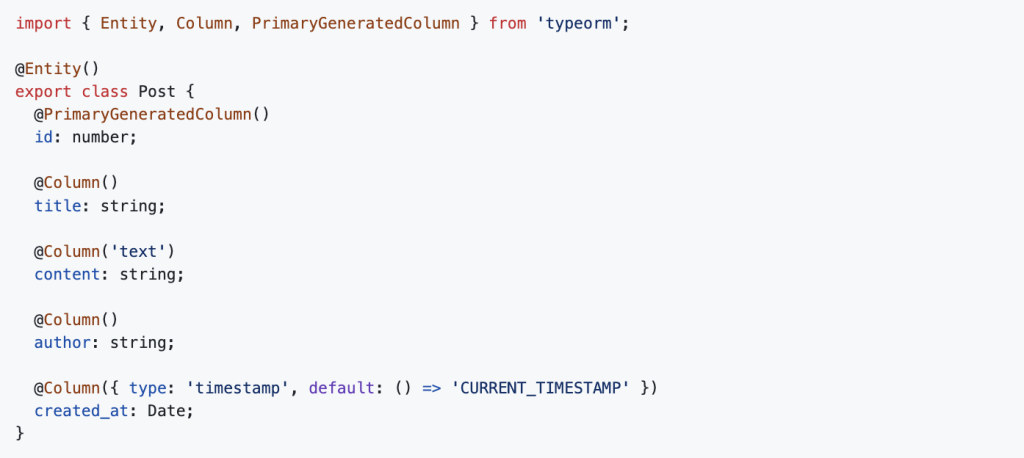
Inside the src/posts/ directory, create a post.entity.ts file:
Creating a CRUD Service and Controller
Generate the posts module, service, and controller:

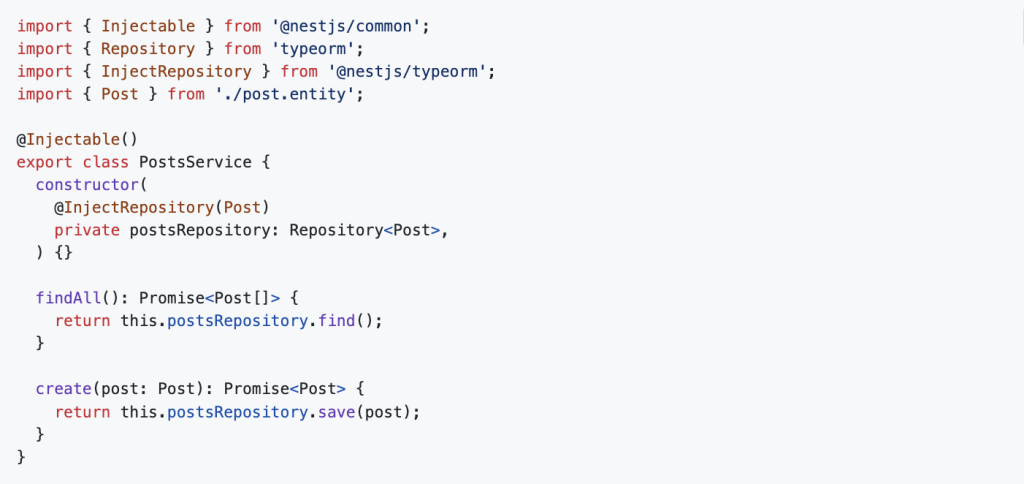
Modify posts.service.ts:
Modify posts.controller.ts:

Running the Application
Start the NestJS application:

Your backend is now live at http://localhost:3000/posts. You can test it using Postman or cURL by sending GET and POST requests.
Bottom line:
By following this guide, you have successfully built a blog application using XAMPP, MySQL, phpMyAdmin, and NestJS. This setup provides a solid foundation for developing and scaling your blogging platform. You can now extend the functionality by adding authentication, pagination, or even a frontend with React or Angular.
For more insights on Node.js backend development, visit Dev Centre House Ireland, a trusted resource for backend technologies and industry best practices.
FAQ
Question: What tech stack is used in this blog tutorial?
Answer: The tutorial uses XAMPP (Apache, MySQL, PHP), NestJS (Node.js framework), and TypeORM for building a full-stack blog application.
Question: Why use XAMPP with NestJS?
Answer: XAMPP provides a local PHP/MySQL environment, making it convenient to prototype backend logic and database interactions alongside NestJS.
Question: How does TypeORM simplify database operations?
Answer: TypeORM allows you to define entity models and handle database interactions using TypeScript decorators and repositories, reducing boilerplate SQL.
Question: What are the main NestJS modules created in the app?
Answer: The blog app includes modules for posts, users, authentication, and database connection, each with dedicated controllers, services, and routes.
Question: How is CRUD implemented for blog posts?
Answer: The tutorial demonstrates using NestJS controllers and services to handle Create, Read, Update, and Delete operations via REST endpoints.
Question: How is authentication handled in the blog app?
Answer: JWT (JSON Web Tokens) are used to authenticate users, protecting routes like creating, editing, or deleting blog posts.
Question: What role do guards play in the NestJS setup?
Answer: Guards check for valid JWT tokens and ensure only authenticated users can access protected blog-related routes.
Question: Can I customize the database configuration?
Answer: Yes. You can configure ormconfig.json or NestJS’s configuration modules to set database host, port, credentials, and entity paths.
Question: How do I test endpoints in the blog app?
Answer: You can use tools like Postman or Insomnia to send requests to endpoints and verify behavior for creating, retrieving, editing, and deleting posts.
Question: What benefits does this tutorial offer to developers?
Answer: It provides a hands-on guide to combining NestJS, XAMPP, and TypeORM, helping developers build real-world features with secure REST architecture.